- How do I manually create a new sales order?
- How does tax work on the sales order?
- How and when can I edit a Pending sales order?
- How do I combine sales orders?
- How do I apply a discount to a sales orders?
- How can I print or send an order confirmation to my customer?
- Where can I see all the shipments for my sales order?
- What happens when a sale occurs in Trade Me?
- How do I delete a sales order?
- How do I credit a sales order?
- Where do I view the status of the Trade Me reminder emails?
- What's holding up the sales order?
- How do I get a Pay Now or Ping refund on a sales order?
Sales orders are created automatically in Tradevine from Shopify sales or Trade Me sales. You can also manually create a sales order at any time.
Adding a sales order
There are a couple of ways to create a new Sales Order:
- From the Sales menu select Add Order.
- From your Sales Orders screen select the Add Sales Order link from the bottom of the list of sales orders.
Enter or edit customer, address and order fields
Only the Customer, Shipping Date and at least 1 product line are required to create a Pending sales order.
- Customer
- Select the person or organisation you are creating the Sales Order for, if the customer does not exist in the drop down options, then select the green
 icon to add a new customer.
 - NB: you can search this field for existing customers based on full or partial matches on name or email address.
- Email customer
- This link enables automatically when the customer has an email address. The link will open a blank email addressed to the customer.
- Billing Address
- You can select an existing Billing Address. Add a new Billing Address by selecting the green icon, if the address doesn't appear in the drop down list.
- Shipping Method
- Choose the Shipping Method required for your sales order.
If you select Collection as your shipping method, then you won't be able to enter a Shipping Address or a Ship to name.
- Ship to
- This allows you to specify a recipient name that may be different from the customer's name. This is not available for collection type orders.
- Shipping Address
- You can select an existing Shipping Address or add a new Shipping Address by selecting the green icon. The Shipping Address can be the same as the Billing Address, just select the Same as Billing checkbox.
- Shipping Date
- Is a mandatory field, which should default to today's date. You can change this for future dated deliveries.
- Payment Method
- Choose between Cash, Bank Transfer, Credit Card, Cheque, Escrow, Other, PayPal or EFTPOS.
- Terms
- Defaults to Immediate. When sales orders are created for a customer, the payment method is defaulted from the payment method on the customer record.
Note: sales orders with a payment method other than Immediate, are able to progress to the shipment stage, even though payment has not been flagged on the sales order. - Payment Received
- This flags the order as paid and has to be completed if you want to Confirm and progress the order. If the payment Terms are not immediate then it is possible to progress the sales order for the shipment and mark the Payment Received checkbox as paid at anytime, including after the goods have been shipped and the sales order has been completed.
- If you are integrated with Xero, then you do not need to select this checkbox, as we will automatically retrieve any full payments made within Xero the next time we poll Xero for updates (approx every 5mins).
- Ref
- Useful for adding in any payment reference details.
- Customer Reference
- Complete any customer references you need for the order. This field can still be edited when the sales order has been completed.
- NB: for Trade Me sales this field is automatically populated with the Purchase reference number. For Shopify sales the field is populated with the Shopify order number.
- Manual Approval
- If you have opted to Manually Approve Sales Orders in your Trade Settings or some products are flagged as requiring manual approval, you will need to confirm the manual approval, before continuing.
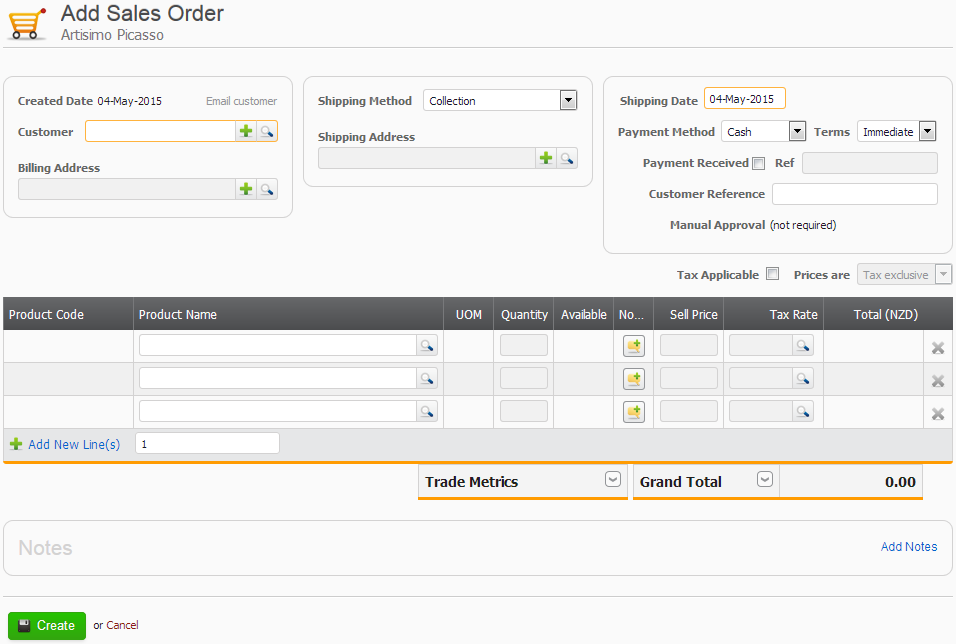
Enter the taxes, products and pricing
By default we provide three product rows ready for use.
Add more product lines by selecting the Add New Line(s) link. Delete product lines by selecting the X icon, at the end of the product line. Alternatively, just remove or change a product by selecting the X icon next to the product name.
- Product Lines
- Use can manually add up to 100 product lines to the order, but each product can only be listed once. If you need to, you can apply different tax rates to each product line on the sales order. You can also override any price, with your own including $0.00, but not a negative amount. You can tab between fields and lines if you don't like your mouse. Any unused/blank lines will be ignored when you create/update the order.
- Product
- Select the product you are selling by either typing in the product code, name, or by selecting the search icon on the right hand side of the product name or by scanning in the barcode.

- You can also search on partial matches and a shortlist of potential products should be displayed.
- UOM
- This will default to the UOM (Unit of Measure) saved against the product.
- Quantity
- Type in the quantity of the product you are selling.
- Notes
- Add in any specific notes in relation to the line, for example any packing instructions.
- Sell Price
- This will be defaulted from the product information stored against the product but can be changed on the order. If you make a change to the Sell Price, this will not update the default Sell Price stored against the product.
- Tax Rate
- This will be defaulted from the tax rate information stored against the product but can be changed for each product line on the order. If you make a change to the Sell Price, this will not update the default Tax Rate stored against the product.
- Trade Metrics
-
Tradevine displays the trade metrics so that you can make business decisions based on the latest information.
- Cost of Goods
- Visible when the Trade Metrics panel is expanded out. Totals the cost of the goods for all the products on the order using FIFO (First In First Out).
- Gross Profit
- Visible when the Trade Metrics panel is expanded out. The difference between the sub total (excl tax) and the total cost of the goods.
- Gross Margin
- Visible when the Trade Metrics panel is expanded out. Percentage difference between the total cost of the goods and the sub total (excl tax). The calculation is: (cost of goods / sub total (excl tax)) – 1
- Average Markup
- Visible when the Trade Metrics panel is expanded out. Percentage difference between the sub total (excl tax) and the total cost of the goods. The calculation is: (sub total (excl tax / cost of goods)) – 1
- Pay Now balance

- Anytime you receive a sale from Trade Me and the buyer paid using Pay Now then the amount received so far will be displayed below the Grand Total.
- Notes – Order Notes (Public)
- Add any notes you want displayed on the order and visible to the customer on the printed PDF.
- If this was a Trade Me sale and the buyer has left a message for the seller then the content of the message will be displayed in the public notes.
- Any additional details from Shopify Apps like gifts etc will be added to the public notes.
- Notes – Order Notes (Private)
- Add any privates notes you want associated with the order that will only be visible to you.
- When orders are combined the details will be briefly summarised in the private notes.
- My Trade Me Notes
- These are ready only and only visible for Trade Me sales when you have updated the Add Note field on the Sold tab within Trade Me itself.
- Create
- Select the Create button to create your order. Your order will progress from a Pending status to an Awaiting Shipment status when all of the following conditions have been satisfied:
- Billing address supplied (not required for Collections)
- Shipping address supplied (not required for Collections)
- Manual approval (if required) checkbox selected
- Payment Method is not Immediate or alternatively, Payment Method is Immediate AND the Payment Received checkbox is selected (by default the Payment Method is set to Immediate for Trade Me and Shopify sales)
- Cancel
- Changes you have made will not be saved. You can return to this screen at any time.
How does tax work on the sales order?
When you create a sales order we will try to best guess the tax settings for the order, to get you started.
The setting of the Tax Applicable checkbox is based on a couple of factors. The first is dependent on whether your Organisation has a tax number configured on the Organisation Details screen. If you don't then by default, the Tax Applicable checkbox will not be selected.
The second factor is the country of the shipping address (For collections this will be the billing address. If neither address has been supplied, the customers address will be used.). So if the country on the sales order matches the country of your Organisation and your Organisation has a tax number, then the Tax Applicable checkbox will be selected.
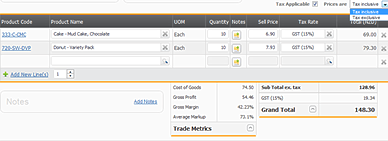
You can override the Tax Applicable setting yourself any time you want.
You can also override the Prices are drop-down at any time to include/exclude taxes. The Prices are dropdown has a similar set of smarts to the Tax Applicable checkbox. Providing your Organisation has a tax number and your Organisations country matches the shipping address country, then it will default to Tax inclusive.
The taxes applied to each of the products is firstly based on the Prices are drop-down and subsequently on the Tax Rate field on each product. The tax rate on the product will only be invoked if the Prices are drop-down is set to Tax inclusive.
Whenever a discount is applied the final tax amount will be based on pro rating the discount amount across the tax applied to each of the taxable products, since the discount is subtracted from the tax exclusive total.
Each product line total is based on the Prices are setting and the Tax Rate for the product. The totals for the Sell Price and the Total fields for each product will include any taxes if they have been applied.
The Tax Rate for each product is only editable, if Tax Applicable is selected.
The Sub Total ex. tax will always display the tax exclusive total, regardless of any taxes applied.
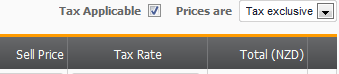
Stock availability status
Each time a product quantity is entered, the available stock count and the availability status will be displayed with a green, orange, red or grey background.
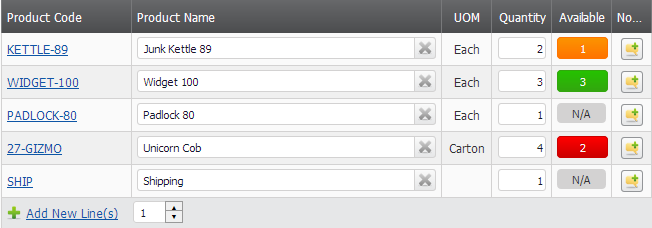
Green – the product can be supplied in full.
Orange – the full product quantity can be supplied, but there is competition for the stock.
Red – the product cannot be supplied, either partially or in full.
Grey – the product is not inventory tracked, so it will be displayed with the text N/A.
Clicking on the coloured status will display a more detailed breakdown of the products inventory.

The stock availability icons will not be displayed for sales orders with a Completed status or when a quantity has not been entered.
Editing a pending sales order
To edit one of your sales orders either select the sales order from the sales order list or use the universal search to find the order by searching on the sales order number.
You can edit the details of most of the fields when the sales order is still in a Pending status. Once the order has been created a Shipments panel will be displayed below the Notes. When the order is in a Pending state, the Shipments panel will inform you of what needs to be done to progress the order to Awaiting Shipment. The same progress information is also displayed near the top of the sales order in the green banner. Once the order has progressed beyond the Pending status, the Shipments panel will display all the shipments for the order and each product line will also show the shipped quantities so far.

There are a few extra buttons available once a sales order has been created. These allow you to email or print order confirmations and pro forma invoices.
![]()
- Update
- The Update button will be available while the order has a Pending status.
- Cancel Order
- Select this if you want to cancel the Sales Order. This will cancel the order and any remaining unshipped quantities if you have shipped part of the order already. If you have already shipped some of the items on the sales order then the order will be set with a status of Completed with Cancellations, otherwise, the status will be set to Cancelled.
- Send Confirmation
- Email or print/post a sales order confirmation to your customer.
- Tradevine has a standard sales order email, but you can create your own customised email template.
-
If you choose to print, the PDF document will download onto your PC using your web browsers default functionality. Your web browser settings control whether to open or save the PDF.
Editing an awaiting shipment sales order
You can edit and change an awaiting shipment sales order provided there have been no shipments.
![]()
Selecting the Edit Order button will revert the sales order back to a pending status and remove any pending shipments. After editing the order you will need to manually approve the order to progress it to an awaiting shipment status.
If you are integrated with Xero and the sales order has already been paid, then you will have to undo the payments in Xero, before you can edit any of the product quantities.
Combine sales orders
Trade Me orders can be combined automatically. You can combine sales orders by opening any sales order that has been flagged as a combine candidate. These will be displayed with a plus icon in the Type column of your list of sales orders. Alternatively, you can find them by selecting the Sales orders can be combined link on the Dashboard.
After opening a combinable sales order, you will see a can be combined link in the banner near the top of the sales order.

Selecting the link will display all the orders that can be combined onto the order you have open.
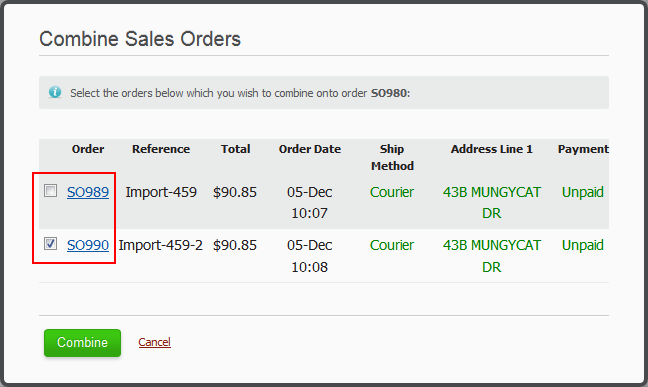
You can then select the orders to combine.
After combining, the products from all the combined orders will be consolidated onto the sales order you have open. If the same product was on multiple sales orders, then it will be summed onto one line per product. Any shipping will also be consolidated and summed onto a single product line and displayed with a quantity of one.
The header banner near the top of the sales order will let you know when a sales order has been combined.

Discounts
A discount can be applied to any pending sales order.
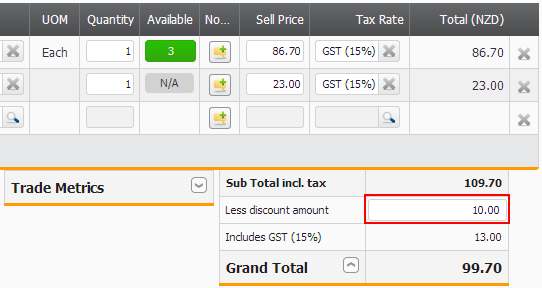
Discounts are applied as flat amounts and not percentage based.
Discounts applied to Shopify sales will automatically come through onto the sales order when it is created in Tradevine.
Whenever a discount is applied, the taxes applied to each product line will be reduced and pro rated based on the amount of the discount. The taxes applied to shipping are excluded from the pro rating.
Shipments
Once an order has moved into the Awaiting Shipment status, a Shipment will automatically be created and displayed in the Shipments panel at the bottom of the Sales Order, as shown below. More than one shipment can be created if the order was dispatched with partial shipments. Select the shipment number link to see the details of the shipment. If the order has not been fully dispatched then the Shipments panel should display a shipment with an Awaiting Pack status. You can also select the shipment from the panel to dispatch it.

Deleting a sales order
Currently it is not possible to delete a sales order. You can cancel a sales order at any time providing it has not been completed.
You can tag a sales order as archived by editing the order and applying an Archived label.
Credit a sales order
You can create a sales return for a sales order by selecting the Generate Sales Return button on any Completed sales orders. This will create a sales return, which you can modify further if you need to. If you are integrated with Xero, then a credit and journal entry will be created in Xero.
Reminder emails
If you configured your Trade Me default settings to cater for reminder emails for when the buyer has not supplied either an address or payment, then you will be able to view the Reminders panel on your Pending sales orders.

The panel shows the dates and times the emails were sent, as well as when your choice of reminder label was applied to the sales order.
You can stop the reminder emails for a sales order by setting the Do not send customer reminders checkbox.
What's holding up my sales orders?
Whenever your sales order is in a Pending state, we will try to explain what needs to be done for the sales order to progress to Awaiting Shipment. We do this in two places on the sales order.
In the banner near the top of the sales order.

In the Shipments panel located below the Notes (since the shipments don't exist yet).

If you opted to check the validity of the address of your Trade Me sales, then you will have to manually approve the sales order's, which have either a rural delivery address, an unknown address or a non-New Zealand address.
The following conditions have to be met for a sales order to progress from a Pending state to an Awaiting Shipment state:
- Billing address supplied (not required for Collections)
- Shipping address supplied (not required for Collections)
- Manual approval (if required) checkbox selected
- Payment Method is not Immediate or alternatively, Payment Method is Immediate AND the Payment Received checkbox is selected (by default the Payment Method is set to Immediate for Trade Me and Shopify sales)
Pay Now refunds
You can claim back the Pay Now sale and commissions for a failed Trade Me sale, that was paid with Pay Now. You can do this for any sales order that was not cancelled and the sales order was paid for, using Trade Me's Pay Now.
Currently when combining sales orders, Pay Now payments become irreconcilable in Tradevine. The Pay Now payments and fees can then only be tracked or refunded through Trade Me.
On a sales order, you can select the Refund Pay Now button.
![]() You can then choose the amount to refund. The full amount will be the default. Providing the refund amount does not exceed the Pay Now amount, Trade Me should instantly apply the refund without any further paperwork.
You can then choose the amount to refund. The full amount will be the default. Providing the refund amount does not exceed the Pay Now amount, Trade Me should instantly apply the refund without any further paperwork.
 Selecting the Cancel Order button on a sales order will also present the opportunity to reclaim the Pay Now commissions and fees. Providing the sale was paid for using Pay Now, then you will also see an option to claim back the Pay Now sale. You will need to select the checkbox to invoke the option. You can then edit the default full amount if you need to.
If you use Xero then whenever you action a refund the Pay Now commission will be applied to a new credit note. Partial refunds will be pro-rated.

Navigating sales orders
You can navigate to and from the next or previous sales order record using the left/right buttons across the top, just below the order number. The back and forward navigation is based on the sort criteria applied to the Sales Order List before opening the order. If you haven’t resorted the sales order list, then the default sorting criteria will be used.
![]()
If you have a search filter applied to your Sales Order List, then the search criteria will be highlighted in colour and this criteria will be used as the basis for the next and previous record navigation.