Adding a shipment
A shipment is automatically created when there is stock to be shipped for the sales order. As the system handles this for you, you are not able to create new shipments. You have complete control over shipping quantities though, and you are able to cancel any remaining quantities if required. So an initial shipment is created once the status of a sales order changes from Pending to Awaiting Shipment. You can either ship all the quantities, in which case no further shipments are created by the system, or you can ship a partial quantity, in which case a further shipment is created for the remaining quantities.
Editing a shipment

- Shipment Number
- This is the sales order number appended with a forward slash and a digit to indicate the number of shipments for the order.
- Sales Order link
- Selecting the Sales Order link will take you back to the original sales order if you need to view the details.
- Product
- The product name and code are displayed on each line of the shipment. Selecting either the product code link or the product name link will take you to the product where you can view the details of the product.
- UOM
- The UOM is displayed to assist with the packing and shipping process.
- Total Stock
- The current warehouse stock for the product across all warehouses.
- W/H Stock
- The current warehouse stock for the product for the selected warehouse.
- Qty Requested
- The quantity to dispatch for the product. This quantity cannot be increased. Decreasing the quantity and saving will create a new shipment for the difference. A new shipment is not created when confirming the shipment with a lesser quantity.
- Qty Packed
- You can enter the number of items you are shipping for each product. It can be less than the Quantity Requested, but cannot be more.
- Qty Back Order
- The system automatically calculates the back order quantity for each product by working out the difference between the Qty Requested and the Qty Packed. You can manually update the Qty Back Order field yourself, but we recommend you update the Qty Packed first. If there is any unaccounted difference in quantities between the amount on back order and the requested quantity, then any outstanding quantities will be cancelled and the order status will be changed to Completed with Cancellations when the shipment is confirmed. Alternatively, you can use the Zero Back Orders button to cancel any remaining back orders.
- Zero Back Orders
- Use this button to cancel out any remaining back order quantities for the entire shipment.
- Warehouse
- The warehouse to ship the stock from. If you only have one warehouse then this will default to that warehouse. If you have multiple warehouses then you can change the warehouse to any enabled warehouse that is also enabled for shipments.
- Shipment Method
- This is the shipping method that was set on the sales order.
- Shipping Address
- The delivery address from the sales order. This includes the recipient’s name.
- Address Pin
- Selecting the pin next to the address, will display the location of the address on a Google Map.
- Customer Phone Number
- If the customer has a phone number or a mobile number then this will be visible.
- Shipped With
- For courier shipments this allows you to select the courier from a shortlist of common couriers. If the courier is not listed, then use the Notes field to state who the courier is. You can configure this field to default to a courier in the shortlist each time.
- Courier Account Number
- If you have an account instead of prepaid tickets for a particular courier, then enter the account number, so that the Tracking References will link correctly with the courier’s tracking website. If you configured the account on the Trade Settings screen then the account number will default automatically when you select that courier.
- Tracking Reference
- You can enter or scan in any tracking references for the shipment. After confirming the shipment, the tracking reference converts to a link and can be used to link to a tracking page on the couriers website. The link will also appear on any shipment emails so the customer can link and track the shipment.
- Once a reference has been entered, you should see a Track link, that you can select to view the progress details of the shipment.
- Tracking Reference (RD)
- Enter or scan in an additional rural delivery tracking reference for the shipment. This field isn’t strictly just for rural deliveries. If you have additional tracking references then feel free to use the additional field.
- Once a reference has been entered, you should see a Track link, that you can select to view the progress details of the shipment.
- Show all shipments link
- Selecting this link will expand out a panel that provides a quick overview of all the shipments linked to the sales order.
- Order Notes
- Read only. These are the public notes from the sales order.
- Delivery Notes
- Useful for entering any additional shipment info, as well as postal details or couriers who are not on the Shipped With dropdown list.
- The notes are private and are not displayed on any of the documentation.
- Print Pick List
- You can print or reprint a pick list by selecting the Print Pick List button.
- Confirm Shipment
- Confirming the shipment allows you to print or email the Pack List and/or the Invoice, as well as print a shipping label if you have a DYMO printer.
- Resend Confirmation
- This option is only available once the shipment has been confirmed. This allows you to print or email the pack list and/or the invoice again. The button is always available, regardless of how many times you resend any confirmations. You can also print a shipping label if you have a DYMO printer.
- Save
- Saves your latest changes without confirming the shipment.
- Close
- Changes you have made will not be saved. You can return to this screen at any time.
Change the warehouse
If you have multiple warehouses then you can change the warehouse assigned to the shipment, otherwise this will default to the primary warehouse and cannot be changed.

You will be able to select any Own or 3PL type warehouse that is enabled and where the Available to ship from status is also enabled.
The stock level for the warehouse will be displayed under the W/H Stock column after you have saved the change.
Confirm a shipment
To confirm a shipment, adjust any of the shipment quantities that need adjusting and select the Confirm Shipment button. This should present a dialogue which will allow you to specify which documents, emails and shipping labels to print.
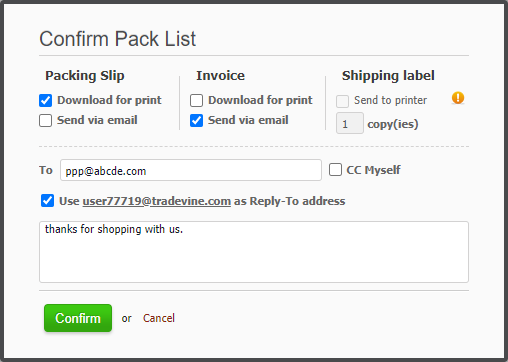
You will also have the opportunity to add your own content to the emails. The content is editable and will persist for each shipment until you decide to blank it out for a shipment confirmation. Any custom text you add will display between the default content and your sign off footer.
You can opt to not print or email anything at all. You can also set a default for the number of shipping labels to print each time. The dialogue is also displayed when resending the confirmation. After confirming a shipment, you should be able to stay on the Shipments screen and traverse to the next pick list using the next or previous arrows.
There are also options to CC yourself as well as sending an email to your organisation’s email address.
Tradevine has a standard set of emails, but you can create your own customised email templates.
If you want to bulk confirm multiple shipments, then check this out.
Deleting a shipment
You cannot delete shipments, but you can revert an awaiting shipment sales order to a pending state provided none of the shipments have been completed for the sales order.
Insufficient inventory
You will not be able to confirm a shipment when you do not have sufficient stock to complete the order. You can either only ship what you have in stock, and the remaining stock goes onto back order, or you can navigate to the product details page by selecting the product code or product name links, and then click on the Inventory tab to make an inventory adjustment to correct the warehouse stock. Once the total Warehouse stock has been corrected, you should be able to reopen and confirm the shipment.
View your shipments
You can view all the shipments for the sales order by expanding the Show shipments link below the Shipping Details panel.

Navigating your shipments
You can navigate to and from the next or previous shipment record using the left/right buttons across the top, just below the shipment number. The back and forward navigation is based on the sort criteria applied to the Shipment List before opening the shipment. If you haven’t resorted the shipment list, then the default sorting criteria will be used. ![]() If you have a search filter applied to your Shipment List, then the search criteria will be highlighted in colour and this criteria will be used as the basis for the next and previous record navigation.
If you have a search filter applied to your Shipment List, then the search criteria will be highlighted in colour and this criteria will be used as the basis for the next and previous record navigation.